Git Peaks #1: The Basics

One tool to rule them all
Operating system, IDE, programming language, browser… Developers care a lot about the tools they use in their work environment, and they often go on a crusade against aficionados of other alternatives whom they consider impious fanatics , whose soul we are trying to save from eternal perdition…
But if there is one tool to rule them all, it most certainly is Go. Developed in 2005, Git has become the majority code versioning solution, far ahead of its predecessors like SVN or Mercurial. Of course there are several Web instances (Github, Gitlab, Bitbucket…), several graphical clients (GitKraken, gitg…) and it is integrated in most IDEs natively. But whatever our environment, in the vast majority of projects we return to this tool that has become central.
The command line remains the official tool, and provides access to all the -very extensive- features of Git. It is however often left aside, neglected for graphical tools allowing to use Git without knowing the commands themselves, often masking the real functioning of Git.
Mastering all the innumerable functionalities of the git cli is of course a colossal task, but the notions necessary to version your code properly are not so complex to grasp, as we will see! Learn the basics of Git, but first, a bit of history…
Go, mekekekece ?
Git is a code versioning tool, which has the following objectives:
- Save & Restore : Save your project regularly by creating a complete history of the evolution of the project, allowing you to return to any point in the history without losing your work.
- Sync & Share : Synchronize all or part of the versions of the project, and share your work with your collaborators.
- Sandbox : Create at will parallel versions of the project without difficulty and without risk for his work or that of his collaborators.
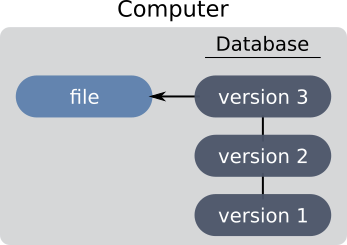
More exactly, Git is a Version Control System (VCS in VO), i.e. a system that saves changes to one or more files over time so you can roll back to a specific earlier version of the project. There are several types of VCS: local, centralized, and shared.
Local systems only allow a project history to be saved locally. The disadvantages are of course obvious: in the event of a breakdown of the local machine, there is no backup of the project, and this system does not manage collaborative work.
To overcome the disadvantages of local systems, centralized VCS have emerged. This time, the developers share a single server which keeps the history. The user keeps the latest version of the project locally. He can push his modifications to the server and retrieve those of these collaborators.
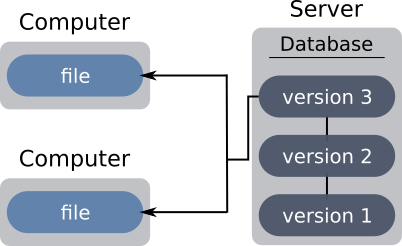
The problem of the breakdown remains intact: in the event of a cut in access to the server, the developers cannot create a new backup (point in the history), and must therefore stop their development under penalty of losing the consistency installed in the project. Worse, in case of loss of the server, although the current version of the project is present on the workstations of the developers, the history is lost to it.
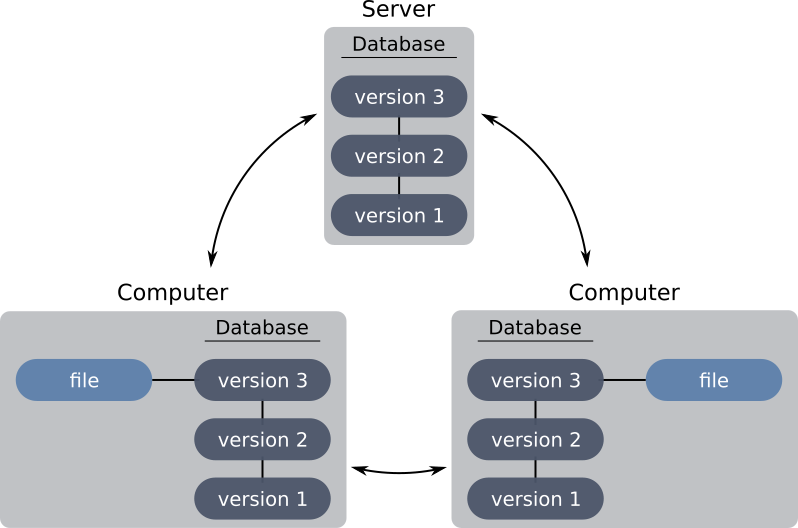
In order to remedy this, distributed version control systems (like Git) offer an architecture in which the history is not only present on the server, but also on the machines of the developers. Specifically, each node can potentially act as a server, allowing developers to send new project changes from one machine to another, bypassing the server.
In practice, we favor the use of a server, because this architecture greatly minimizes the risk of loss of information. » In the event of a server crash, the developers will be able to set up a new server and push the history present on the machines of the developers to it.
In 2005, BitKeeper, hitherto CVS used to version Linux kernel code, became paid. The Linux kernel developers then decided to create Go, which will quickly take the top spot among versioning tools. Git is developed with the idea of being Fast, tailored, completely distributed.
The Git command line, why?
There is a range ofgraphical interfaces to Git. Whether it's the web interfaces (Github, Gitlab) or the local interfaces, they make it possible to overcome (at least in part) the use of the Git command line. Indeed, people often perceive it as being too complex and incomprehensible. However, it remains the only interface that allows you to really control the management of your repository, and therefore of the code. And the code, in the IT business, is the vital part of the project. Using a GUI without prior knowledge of the command line is often convenient, "as long as everything goes well". But at the first difficulty it becomes difficult to solve the problem graphically. Most of the time we come back, with the help of the internet, to a series of obscure Git commands to get us out of this mess…
Of course, fully mastering the Git command line takes years of experience. Git is indeed a very complete tool.
Git Basics
Git basics to get started
Git is a code versioning system distributed. So we push our code to one or more servers. To do this, Git must identify and authenticate us. The first part is done by configuring our names and emails like this. Attention ! The email address entered must correspond to that entered on the Web server (Github, Gitlab, etc.).
$ git config --global user.name "My Name" $ git config --global user.email "my_email@peaks.fr"
Authentication can be done in two ways: https or ssh. It depends on the address used to clone the repository (in `https://` or in `git@`). Authentication with https requires a login/password, while authentication with ssh uses the default id_rsa key (usually in `.ssh`).
To go a little further, we can also define the default commit message editor
$ git config --global core.editor nano
Note: nano has the advantage of being available on linux and MacOS, and by default with Git Bash on windows
Then, just clone the project using its address.
We now have our local version of the project, ready for development!
Saving your work, the basics of Git
The basis of Git is the c, project save point. When you are satisfied with the changes made to the project, you can commit the changes you want to add to the savepoint (`git add`) and then create the savepoint (`git commit`). The commands are as follows:
# changes to $ git add files$ git commit -m'explicit commit message'
The commit message is very important, when looking at the change history of the project, it will be the reference point to understand the changes related to the commit.
The new commit now appears in the list of commits, visible with gitlog.
We can then continue to work, knowing that whatever happens, it will always be possible to come back to this precise point in the project. When the user is happy with their work again, I create a new commit, furthering their project's history.
Share your work
Git is primarily a local tool. Changes are only shared when the user uses commands requesting it explicitly. To send your work to the server, you must foremost recover the modifications made by the collaborators, and submit own changes. This gives:
#Get remote changes and add them locally $ git pull #Send local changes to server $ git push
And There you go ! With 4 basic commands (`git add, commit, pull and push`), you can already save your work with Git and share it with your collaborators!